Product Care & Maintenance
Andersen® windows and patio doors are designed for beauty, efficiency and convenience. Periodic care and maintenance help keep Andersen® products attractive and functioning efficiently. In most regions, products may require cleaning only a few times per year (Some coastal areas, industrial areas or agricultural areas contain high amounts of airborne particles and may require more frequent cleaning).
General Care


Patio Door Care


For Andersen® or EMCO® storm door care and maintenance tips, visit the Support Center at the Andersen Storm Door Parts Store.
Use extreme care when working around window openings. Never leave a window opening unattended when children are present. Falling from a window opening may result in injury or death. Use of ladders and/or scaffolding and working at elevated levels may be hazardous. Follow equipment manufacturer’s instructions for safe operation. Use extreme caution when working around window and door openings. Injury and/or falls could occur.How to: Clean your Glass
Mild Cleaning (dust, dirt, smoke, film, soot or salt spray) | Heavy Cleaning (heavy dirt/grime) | |
| What you'll need: |
|
|
| Instructions | 1) Apply detergent./solution to glass using soft cloth or brush 2) Lubricate all moving parts with a multi-purpose dry lubricant spray (Oily lubricants or harsh abrasive cleaners are not recommended.) | 1) Wipe loose debris from the glass surface with a soft, dry cloth 2) Apply a cleaning solution (mild soapy water, vinegar or a liquid window cleaner) wipe in a circular motion 3) Remove cleaning solution with a squeegee or a clean, lint-free cloth 4) Lubricate all moving parts with a multi-purpose dry lubricant spray (Oily lubricants or harsh abrasive cleaners are not recommended.) |
As a general practice, you should never clean glass in direct sunlight.
TECHNIQUES/PRODUCTS THAT CAN DAMAGE YOUR GLASS
|
NOTE: If you have Andersen® 400 Series products that come standard with High-Performance™ Low-E4™glass - this type of glass has a low-maintenance exterior coating and removable protective film. The low-maintenance exterior coating is highly durable but may be damaged if abrasive or hard objects are used for cleaning.
To learn how to identify the vintage of windows you have, click here
How to: Clean Your Grilles and Insect Screens
 | Mild Cleaning (dust, dirt, smoke, film, soot or salt spray) | Heavy Cleaning (heavy dirt/grime) | Regular Care & Maintenance Andersen® Insect Screens |
| What you'll need: |
|
|
|
| Instructions | 1) Clean with a mild detergent, water solution and a soft cloth or brush | 1) Clean with a stronger solutions, such as Mr. Clean®, Soft Scrub® or rubbing alcohol - avoid contacting glass surface with any abrasive materials 2) Use a soft cloth or sponge (For either conventional insect screens or premium TruScene® insect screens) | 1) Clean using mild soap, fresh water and a soft brush 2) After cleaning, rinse thoroughly with fresh water |
Gliding Patio Door - Insect Screen & Track Care
| | Regular Care & Maintenance Gliding Patio Door Insect Screen & Track |
| What you'll need: |
|
| Instructions | 1) Clean with soapy water and a garden hose 2) Use a soft-fiber brush to remove any debris 3) After cleaning, thoroughly rinse the insect screen and track to remove all soap residue |
How to: Maintain Andersen® Hardware
 | Your Andersen® hardware has been manufactured of high-quality, fine metal. Fine metal requires periodic attention to maintain its beauty and characteristics. Climate, location, and exposure to corrosive environments such as industrial areas, pesticides, herbicides, or salts can affect the hardware’s beauty and characteristics. • DO NOT use or apply harsh chemicals, abrasives and/or cleaners. Product damage could occur. • DO NOT refurbish hardware. Contact a professional hardware restorer for refurbishing. |
Bright Brass, Antique Brass, Satin Nickel, Distressed Nickel, White or Stone | Polished Chrome or Brushed Chrome | Oil-Rubbed Bronze or Distressed Bronze |
Andersen bright brass and satin nickel hardware finishes are protected with a physical vapor deposition (PVD) coating process resulting in a beautiful finish that’s resistant to scratching, corrosion and tarnish. Andersen satin nickel and bright brass are covered by the same 10-year transferable limited warranty. |
| Handling and frequent use create the bronze patina that is the hallmark of the oil-rubbed bronze and distressed bronze finishes. Oil-rubbed bronze and distressed bronze are “living finishes” with no protective coating. With use, your hands will polish away the darker material exposing the bronze beneath. The appearance of these finishes will vary depending on usage and environmental conditions. • Occasionally apply light mechanic oil to deepen the color and sheen of the product. Cover metal parts with oil entirely, allow the oil to stand for a few minutes and then gently rub off excess using a clean cloth. |
Note: For additional hardware performance and warranty information visit our website: www.andersenwindows.com
How to: Clean the Outside Frame of Your Window
Mild Cleaning (dust, dirt, smoke, film, soot and salt spray) | Heavy Cleaning (grease, oil or industrial solids) |
Lubricants or harsh abrasive cleaners are not recommended. |
Lubricants or harsh abrasive cleaners are not recommended. |
Understanding Condensation
Have you wondered why is there condensation on your window or patio door glass? View this helpful video on understanding condensation.
Condensation can form on interior glass surfaces when there is too much moisture in the air. If the interior of a structure exceeds certain limits of moisture in the air, the moisture will condense and show up on comparatively cooler surfaces, such as glass. Recommended humidity levels in winter months should not exceed 30-35%. If these humidity levels are exceeded, you may want to take measures to reduce the interior humidity level. View our video to see tips on reducing humidity in your home! For more information on condensation and lowering humidity, visit our Help Center. For information on understanding condensation and tips on preventing drafty windows or patio doors click here. |
How to: Adjust your Inswing Hinged Patio Door
Your Andersen® hinged patio door is designed to give you years of trouble-free operation. It can be adjusted to help you get the best possible performance.
If your Frenchwood® or A-Series inswing patio door rubs against the frame or the sill, you can adjust the door panels horizontally and vertically within the frame. Note: The design of the hinge changed in 2005 - download the adjustment instructions below for those patio doors. Click here to determine the vintage your Andersen hinged patio door
|
How to: Adjust your Outswing Hinged Patio Door
Your Andersen® outswing hinged patio door is designed to give you years of trouble-free operation. It can be adjusted to help you get the best possible performance.
How to Adjust your 400 Series Frenchwood Outswing Hinged Patio Door | If your outswing patio door rubs against the frame or the sill you can adjust the door panels horizontally and vertically within the frame. Want additional tips? |
How to: Adjust your Gliding Patio Door
Your Andersen® gliding patio door is designed to give you years of trouble-free operation. It can be adjusted to help you get the best possible performance.
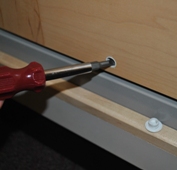 | If your Andersen® gliding patio door operating panel is moving stiffly, it may be dragging slightly because the door is out of adjustment. 1) Remove the caps located on the interior bottom rail of the door 2) Insert a flat blade screwdriver, turning the screwdriver clockwise to raise the panel and counterclockwise to lower the panel (see image) 3) Move one notch at a time, checking the operation of the door panel as you go 4) Close the panel to within one inch of the side jamb and check for uniform opening from top to bottom 5) Replace caps when adjustment is complete 6) After adjusting the rollers for operation and checking for an even reveal, you may need to adjust the latch receiver. The reachout lock mechanism is designed to pull the operating panel into the weather-stripping for optimal contact. 7) Close the operating panel slowly 8) When the pin on the receiver makes contact with the button on the deadlock, slowly turn the inside thumb latch to the lock position. The latch should engage the latch receiver smoothly and pull the panel into the side jamb for a snug fit. |