Patio Door Adjustments
Patio Door Adjustments
Hardware and other moving parts may need to be periodically cleaned and lubricated with a dry lubricating spray.
HOW TO: ADJUST YOUR INSWING HINGED PATIO DOOR
If your Frenchwood® or A-Series inswing patio door rubs against the frame or the sill, you can adjust the door panels horizontally and vertically within the frame.
Note: The design of the hinge changed in 2005. Download the adjustment instructions below for Frenchwood Inswing Hinged patio doors manufactured before 2005.
Click here to deterine the vintage your Andersen hinged patio door
- The A-Series inswing patio door does uses the same hinge adjustment instructions as Frenchwood hinged doors manufactured after 2005.
![]() Download Hinge & Hardware Adjustments (for Hinged Patio Doors manufactured prior to 2005)
Download Hinge & Hardware Adjustments (for Hinged Patio Doors manufactured prior to 2005)
![]() Download Hinge & Hardware Adjustments (for Hinged Patio Doors manufactured after 2005)
Download Hinge & Hardware Adjustments (for Hinged Patio Doors manufactured after 2005)
HOW TO: ADJUST YOUR Outswing HINGED PATIO DOOR
If your outswing patio door rubs against the frame or the sill you can adjust the door panels horizontally and vertically within the frame. View the video below for instructions to adjust panels.
HOW TO: ADJUST YOUR Gliding PATIO DOOR
To adjust your Andersen® gliding patio door:
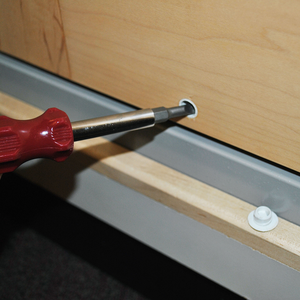
1) Remove the caps located on the interior bottom rail of the door
2) Insert a flat blade screwdriver, turning the screwdriver clockwise to raise the panel and counterclockwise to lower the panel (see image)
3) Move one notch at a time, checking the operation of the door panel as you go
4) Close the panel to within one inch of the side jamb and check for a uniform revel from top to bottom
5) Replace caps when adjustment is complete
6) After adjusting the rollers for operation and checking for an even reveal, you may need to adjust the latch receiver. The reachout lock mechanism is designed to pull the operating panel into the weatherstripping for optimal contact
7) Close the operating panel slowly
8) When the pin on the receiver makes contact with the button on the deadlock, slowly turn the inside thumb latch to the lock position. The latch should engage the latch receiver smoothly and pull the panel into the side jamb for a snug fit